
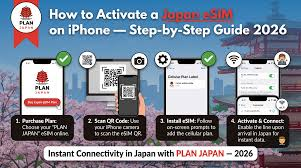
Most guides explain what an eSIM does, yet very few show how to activate it in a way that feels clear in real situations. That gap becomes noticeable the moment you arrive in Japan and need your phone to work instantly without delays.
For first-time users, the process can feel slightly technical at first glance. In reality, it is designed to be quick once you know the steps. This guide breaks it down in a simple way. With a travel eSIM for Japan, you can complete activation smoothly and stay connected from the moment your trip begins.
Understand Your Data Plan Before Activation
Before activating your eSIM, it helps to understand how your data plan works. Activation usually starts your plan’s validity period, which means your data begins counting down immediately once it is turned on.
Many plans come in bundles such as 3GB, 5GB, or higher options, depending on your travel needs across the country. Choosing the right size ensures you do not run out of data during important moments. Matching your plan with your daily usage helps you stay connected without needing constant adjustments later.
Check Device Compatibility Before You Begin
Before starting the activation process, confirm that your smartphone supports eSIM functionality. Not all devices are equipped for it, and compatibility affects how smoothly everything works.
Check your phone settings or manufacturer details to verify support. This step ensures your device can connect properly once you arrive in Japan. Skipping this check can lead to confusion later. A compatible device helps you complete activation faster and ensures stable connectivity across different regions.
Get Your QR Code Ready for Installation
Your QR code is the key to activating your eSIM. It contains the details needed to connect your phone to a local network in Japan.
Keep this code saved in an accessible place before you begin. You may receive it through email or your account dashboard. Having it ready avoids delays during setup. This simple preparation step makes the entire process smoother, especially when you are setting up your connection after arrival.
Add the eSIM Profile to Your Phone
Once your QR code is ready, you can add the eSIM profile to your device. This step links your phone to the network configuration needed for data access in Japan.
Open your phone settings and locate the option to add a mobile plan. Scan the QR code and follow the prompts. The profile will install within a few moments. This step does not require technical expertise, though attention to detail helps you avoid errors during setup.
Adjust Network Settings for Proper Activation
After installation, your phone may need a few adjustments to start working correctly. These settings ensure your connection functions as expected across the country.
Enable mobile data and confirm that your eSIM profile is selected as the active data line. In some cases, you may need to turn on data roaming. These small changes help your device connect properly. Once configured, your phone is ready to access local networks without interruption.
Understand Activation Timing and Validity
Activation timing plays a key role in how your plan works. Many eSIM plans begin their validity period as soon as they are activated.
This means activating too early may reduce your usable time. It is better to activate your plan when you are ready to start using data in the country. Understanding this detail helps you align your plan with your travel schedule. It also prevents unnecessary loss of active usage time.
Troubleshoot Common Setup Issues Quickly
Even with a simple process, small issues can appear during activation. Knowing how to handle them saves time and reduces frustration.
Common issues and quick fixes
- QR code not scanning due to glare or low brightness
- eSIM profile installed but not selected as active
- Mobile data turned off after installation
What to do next
- Restart your device to refresh network settings
- Recheck your data and network preferences
- Ensure your phone supports local network bands
These steps help resolve most issues quickly and keep your setup on track.
Simple Steps to Keep Your Connection Stable
Once your eSIM is active, maintaining a stable connection becomes important during your trip to Japan.
Helpful practices for daily use
- Check your connection before leaving your hotel
- Save important travel details offline
- Avoid changing network settings frequently
Why these steps matter
A stable setup reduces interruptions and keeps your phone ready for navigation and bookings. These habits help you stay connected without needing constant adjustments.
Travel becomes easier when your connection works from the start. Each step in the activation process plays a role in how smoothly your setup performs. A travel eSIM for Japan gives you flexibility, though proper setup makes the real difference. With clear steps and simple checks, you can stay connected and focus on your trip without unnecessary delays.
